Showing posts with label frame. Show all posts

Tuesday, November 5, 2013

Repurposed Vintage Frame Turned Corkboard

I know, I know! It's been forever! But I have excuses. I've been busy. I'm grateful to have been working, and to have more auditions to go to, since it's prime in the middle of episodic season. But that doesn't mean I haven't been prettifying our home. I mean, let's be totally clear here. What's a weekend without some spray paint and a hot glue gun?

A few years ago, when I first moved to LA, I passed by a yard sale and bought this cool vintage wooden picture frame for $2. Here it is on the mantle at my former bachelorette pad:


That's the best pic I have of it, unfortunately. It was a nice dark wood, but my favorite thing about it was the curvature of the top. I don't know what it was...an old frame for a painting, perhaps, or something that had some kind of religious icon in it? Who knows. The shape seems to point to that. It was hard to find mirror to fit it or glass to turn it back into a picture frame, but the empty frame thing works for me as decor, so I kept it.

For years, it sat on my mantlepiece and then in our new office, alone and always a little sad-looking. Earlier this year, in an attempt to make it pop against our charcoal grey wall in our office, I painted it white.


Here it was in our pre-madeover office, earlier this year...


Still blah, right? This summer, as part of Apartment Therapy's room renovation challenge, I decided to tackle the dreary, cluttered office by organizing, downsizing, and injecting a little bit of color. I needed a cork board to help me tidy up my desk and to also serve as sort of a mood board, but found that most commercially available ones were both ugly and expensive.

Solution? Make my own and ombre that sucka with color! I bought a sheet of cork board from Amazon, traced the outline of the frame onto it with chalk, and cut it to size using a razor.


Then I used painters tape to divide the board into sections.


Took out some good ol' Martha Stewart craft paint...


And, using a sponge brush, did about three coats in each section.


I lifted up the tape while the paint was still wet, then waited for it to dry before filling in the other sections since I'd need to retape to get hard edges.


Meanwhile, while the paint was drying, I took that old frame outside and gave it a good ol' coat of my favorite Midas Touch.


A few swift coats and everything I touch is GOOOOOLD!


Then, to create a solid backing, I cut a piece of cardboard to fit the back of the board and hot glue gunned that sucker to the frame. I also used a staple gun for good measure.

Don't my nails look like the Enchantment Under the Sea dance from Back to the Future?

To spice up my push pins, I played around some more with the glue gun and whatever little doodads I had lying around. I'll do a future post on how to make cute push pins.


And ta da! A useful corkboard, a happy, repurposed frame, and a bright pop of color into our office.


Here it is again, from before:


...to after:


Wednesday, April 3, 2013

DIY Framed Vintage Wallpaper

I've been obsessed with wallpaper ever since I used it for the backdrop of a short film that I wrote and produced, Mouthbreather. It was central to the film's set design and helped me build an appropriate setting for the character of a reclusive cat lady (i.e., me).


Actually wallpapering an entire room is too much of a commitment for me since we rent our duplex and don't plan on being here forever. But that's why framed wallpaper is perfect for those of us who have  commitment design issues. 

I've been fantasizing about framed wallpaper since I first saw these two images in the now defunct Domino magazine, years ago: 


Oh, the florals and birds against the dark background! The chinoiserie of it all! These images make me feel like I'm an old dame living in some French country villa where my pet pugs sit on chairs and I spend my time serving tea, eating macarons, and playing croquette in the garden.

Inspired, I bought a roll of vintage Thibaut wallpaper off of eBay from this awesome source about half a year ago for $35. It then proceeded to sit in a box in the corner of our entryway for, oh, another half a year. Yeah, I'm an expert at procrastination.


Mainly, I had all these questions: How much would it cost to frame it? Where could I go? Would I have to mount the wallpaper myself? Should I use wallpaper glue or double-sided tape? And most importantly, what's the difference between Greek yogurt and Icelandic yogurt?!?!

A quick Internet search showed me that taking my wallpaper to a framer's would cost several hundred dollars each, especially if I wanted to do large panels. So I decided to DIY it by ordering build-your-own frames online from American Frame. (The frames then sat in the corner for another two months. The instructions looked crazy daunting even though I have a PhD in Ikea.) 

But this weekend I decided enough is enough! First I laid out the wallpaper against the mat board...


....and trimmed it down to size with my trusty blade:


The Chinese in me says waste not, want not. Wallpaper scraps can go to covering frames and creating smaller pieces to frame and give away as gifts.


Then, out to the garden to glue the wallpaper to the mat board with some spray adhesive.


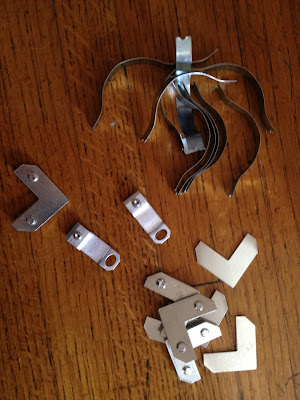
While waiting for the glue to dry, I built the frames, which I didn't photo document since I was sitting in the middle of the floor, surrounded by about 8,000 metal pieces, swearing like a sailor. WTF are you supposed to do with all these metal THINGAMABOBS YO-


Ahhh...fasteners and springs and bolts and whatnot.


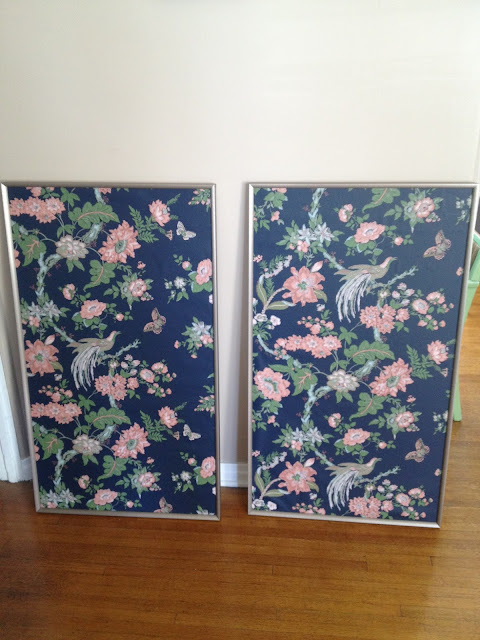
Slide the dried wallpaper-mounted board in and ta-da! No need for glass or backing as I wanted the original texture of the wallpaper to be right there. I'd cut two different sections of the wallpaper so that I'd have two varying patterns (even though the bird repeated about every 38" or so). Here's the final product:


By the way, I'm a full-on convert of American Frame now. It's much cheaper than getting your art framed at a framer, and once you figure out how to do it one time, it's easy as pie. The only thing they didn't include for some odd reason was the hanging wire. A trip to the hardware store, a few sailor swears and about ten new nail holes in the wall later, these suckas were hanging over our bed.


The small size of our bedroom makes it hard to take photos, but I did the best I could. A serendipitous discovery: the dark navy of the wallpaper background matches my refinished dresser, and the grey peacocks match our sheets.

I swear these cats posed here on their own volition.
Some bedside table details...


Anemones from the farmer's market, and tinted blue mason jar leftover from the wedding.


Monday, March 4, 2013

With a Little Help from my Friends...

Any Asian knows at least one person who's got their glamour shot wedding photo blown up to a wall-sized canvas and displayed in their living room.

Sorry, I found your pic on Google.

Needless to say for me, hells to the no. I've always shied away from putting too many personal photos on display in my house, but I'm rethinking that now. My parents' living room is cluttered with personal photos of our family vacations, weddings, kids, etc--and I love looking at all of them. My husband and any other visitor also gets a kick out of seeing all these old photos of us.

Recently, I visited a friend who'd moved to a city far away from her friends. Her apartment was filled with great photographs of her family, friends, and pets, all framed and, quite honestly, evoking those very people, even thousands of miles away. It was a testament to why we keep old photos and display them. It's like having your friends and your memories all around you, at all times.

I've yet to put up photos because I just haven't gotten around to getting frames, but also I'm trying to figure out a good way of displaying images without cluttering up our space and while keeping the overall aesthetic of our home.

Here are a few ideas I'm toying with to display more personal photos:

Create a cluster of frames

A pic here or there may look messy, but strength in numbers is key!


From theeverygirl.com
From Apartment Therapy

or something more geometric, like what I did for these cool Cassia Beck photos:


Create a shape out of unframed photos

From Thefancy.com

Clotheslining Polaroids

We have a bunch of great polaroids from our wedding that would work great for this. And we could really fill up the office window (which looks sort of gross anyway) with this trick.

From Apartment Therapy
Create a rotating clip board 

This super simple DIY featured on creativemama.com involves a strip of wood, screws, and four paper clips--plus your choice of photos to display and change as you please.

From Creativemama.com

Keep a photo board / mood board

Nothing better than working at your desk and looking up to see all the people you're not hanging out with.

From Dustjacketattic

I love this idea...would work great with our dark office wall.

From Smitten Studio

Create washi tape frames

Cheap, colorful, and cute!


Wednesday, March 14, 2012

How Math Class Finally Came in Handy

Two years ago I bought these tiny 4x4 prints from British photographer Cassia Beck. Something about her work really reminds me of my early childhood in Denville, New Jersey. Maybe it's the vintagey feel, and maybe it's the perspective -- so much of it is "from the bottom looking up" that it reminds me of being a kid and having everything tower over me. But I mainly think it's the colors and the subjects. Everything she shoots looks foggily like something I've seen before in my life.

I chose 9 of her prints, which was like choosing goodies from a candy shop! They then sat around in my desk for the past 2 years because apparently no manufacturer has ever had the brilliant idea to MAKE 4 x 4 size frames, dammit. Finally, after fruitless searches at Ikea, Target, Bed, Bath & Beyond, and the rest, I gave up and brought them to a frame shop in LA.

I decided to group them together to create one larger "piece" that reflects images that resonate very strongly with me. This one's my favorite. It reminds me of the forsythia that grew on the border of our yard in my childhood home.

achoo!

I lived on Magnolia Avenue, so we naturally had magnolia trees in our front yard and all the way down the street. This perspective is something I saw a lot.

This too. This reminds me of noticing telephone wires on my street for the first time in my life, and learning all about cardinals and bluejays by watching those little perchers waiting for my brother to come home from school.
chirp chirp chirp

Ok, this one I just like. It's a tea cup. I likes me some tea. This makes me think of sitting in a deserted coffee shop at night.
i'm so lonely

This one too. It makes me feel like I should be typing this on a cute vintage typewriter instead of this worn out Mac Book Pro. Beep boop boop beep technology.

clickety clack clack clack

This one makes me think of the lake at the park we used to go to for family picnics. The frozen one that my childhood dog Ginger ran onto during the winter to chase after ducks and then crashed through the ice into freezing cold water. Don't cry for her, she's already dead.

squawk!
We had tulips planted in a bed in a row along the front of our house, so they were probably the first flower I remember becoming super acquainted with.


This one reminds me of my brother's toy box when we were little. Man, how we smashed the crap outta those cars! They've recently been recycled and passed onto my brother's son/ my nephew, along with a battered Voltron and a green He-Man Battlecat/Cringer figurine, which stayed surprisingly newish over the past 25 years. A family heirloom, I suppose.

vroooooooom!

Here's a pic of the actual childhood. My 2 favorite things about this: 1) I'm holding the construction hat dog upside down, and 2) my brother is holding a very real looking weapon.


I carefully measured the space between two of our windows in the living room so that I could create a uber-symmetrical canvas. Lessee,  58" divided by 2, divided by another 2, minus 2 inches for the frame....gee, math is haaaaaaard.

excuse me, ma'am. no photos please.

Here's the final product! If I were to do it again,  I woulda shelled out the extra $100 for the matte, to make them bigger. Oh well. It's like having a mini photo gallery in our living room. Don't worry, I fixed the crooked upper right frame after the photo, ALRIGHT?

The blue phone hidden in the left corner is a prop from my short film, Mouthbreather.

On a side note, the apple blossoms I picked up from Rolling Greens the other day are opening quite nicely.

I like to live on the edge.

And my new rug for the office finally came in. I love chevron! And so does this guy.

What a cat-astrophe!